
Để thực hiện được việc thêm trường dữ liệu mới vào trang Đăng ký WordPress (Woocommerce), bạn cần thực hiện các bước sau:
- Enable WooCommerce Registration Form
- Add Custom Field in WooCommerce Registration Form
- Add Custom Fields to the Frontend
- Add Validations to Custom Fields
- Save the Data of Custom Fields to Database
Bắt đầu thôi nào.
Mở tính năng cho phép đăng ký (Enable Woocommerce Registration Form)
Đến menu WooCommerce → Settings.
Chọn tab Account & Privacy và tick vào ô Allow customers to create an account on the “My Account” page
Sau đó Save Changes
Lúc này, bạn có thể đi đến trang Accoung (Tài khoản) và sẽ thấy ô đăng ký mặc định của Woocommerce.
Thêm trường dữ liệu mới (Add WooCommerce Custom Fields in Registration Form)
Sử dụng đoạn code PHP snippets sau đây:
function wooc_extra_register_fields() {?>
       <p class="form-row form-row-wide">
       <label for="reg_billing_phone"><?php _e( 'Phone', 'woocommerce' ); ?></label>
       <input type="text" class="input-text" name="billing_phone" id="reg_billing_phone" value="<?php esc_attr_e( $_POST['billing_phone'] ); ?>" />
       </p>
       <p class="form-row form-row-first">
       <label for="reg_billing_first_name"><?php _e( 'First name', 'woocommerce' ); ?><span class="required">*</span></label>
       <input type="text" class="input-text" name="billing_first_name" id="reg_billing_first_name" value="<?php if ( ! empty( $_POST['billing_first_name'] ) ) esc_attr_e( $_POST['billing_first_name'] ); ?>" />
       </p>
       <p class="form-row form-row-last">
       <label for="reg_billing_last_name"><?php _e( 'Last name', 'woocommerce' ); ?><span class="required">*</span></label>
       <input type="text" class="input-text" name="billing_last_name" id="reg_billing_last_name" value="<?php if ( ! empty( $_POST['billing_last_name'] ) ) esc_attr_e( $_POST['billing_last_name'] ); ?>" />
       </p>
       <div class="clear"></div>
       <?php
 }
 add_action( 'woocommerce_register_form_start', 'wooc_extra_register_fields' );
Ở đoạn code trên, mình sử dụng function woocom_extra_register_fields() để thêm 3 trường dữ liệu mới là (Phone, First Name and Last Name) ra ngoài frontend. Bạn có thể thay thế bằng các trường dữ liệu khác của Woocommerce bằng các cú pháp được liệt kê bên dưới đây:
- billing_first_name
- billing_last_name
- billing_address_1
- billing_address_2
- billing_phone
- billing_company
- billing_city
- billing_postcode
- billing_country
- billing_state
- billing_email
Thêm xác thực vào trường dữ liệu mới (Add Validations to Custom Fields)
Bước này là bước để thêm vào tính năng Required (yêu cầu phải điền, không được để trống) để có thể xác thực đăng ký. Nếu người dùng không điền vào thì họ sẽ không thể đăng ký, và Woocommerce sẽ báo lỗi.
Nếu trường dữ liệu mới thêm vào KHÔNG BẮT BUỘC phải điền thì bạn không cần thực hiện bước này.
Đoạn code PHP như sau:
    /**
    * register fields Validating.
    */
    function wooc_validate_extra_register_fields( $username, $email, $validation_errors ) {
          if ( isset( $_POST['billing_first_name'] ) && empty( $_POST['billing_first_name'] ) ) {
                 $validation_errors->add( 'billing_first_name_error', __( '<strong>Error</strong>: First name is required!', 'woocommerce' ) );
          }
          if ( isset( $_POST['billing_last_name'] ) && empty( $_POST['billing_last_name'] ) ) {
                 $validation_errors->add( 'billing_last_name_error', __( '<strong>Error</strong>: Last name is required!.', 'woocommerce' ) );
          }
             return $validation_errors;
    }
    add_action( 'woocommerce_register_post', 'wooc_validate_extra_register_fields', 10, 3 );
Ở đoạn code trên, mình đã cài đặt:
- Xác thực với trường First name: báo lỗi nếu để trống “First Name is required!”
- Xác thực với trường Last name: báo lỗi nếu để trống “Last Name is required!”
- Không áp dụng xác thực với trường Phone (không bắt buộc)
Lưu thông tin trường dữ liệu mới vào Database của website (Save the Data of Custom Fields to Database)
    /**
    * Below code save extra fields.
    */
    function wooc_save_extra_register_fields( $customer_id ) {
        if ( isset( $_POST['billing_phone'] ) ) {
                     // Phone input filed which is used in WooCommerce
                     update_user_meta( $customer_id, 'billing_phone', sanitize_text_field( $_POST['billing_phone'] ) );
              }
          if ( isset( $_POST['billing_first_name'] ) ) {
                 //First name field which is by default
                 update_user_meta( $customer_id, 'first_name', sanitize_text_field( $_POST['billing_first_name'] ) );
                 // First name field which is used in WooCommerce
                 update_user_meta( $customer_id, 'billing_first_name', sanitize_text_field( $_POST['billing_first_name'] ) );
          }
          if ( isset( $_POST['billing_last_name'] ) ) {
                 // Last name field which is by default
                 update_user_meta( $customer_id, 'last_name', sanitize_text_field( $_POST['billing_last_name'] ) );
                 // Last name field which is used in WooCommerce
                 update_user_meta( $customer_id, 'billing_last_name', sanitize_text_field( $_POST['billing_last_name'] ) );
          }
    }
    add_action( 'woocommerce_created_customer', 'wooc_save_extra_register_fields' );
Ở đoạn code trên, mình đã thêm function woocom_save_extra_register_fields($customer_id) để lưu trường mới vào database.
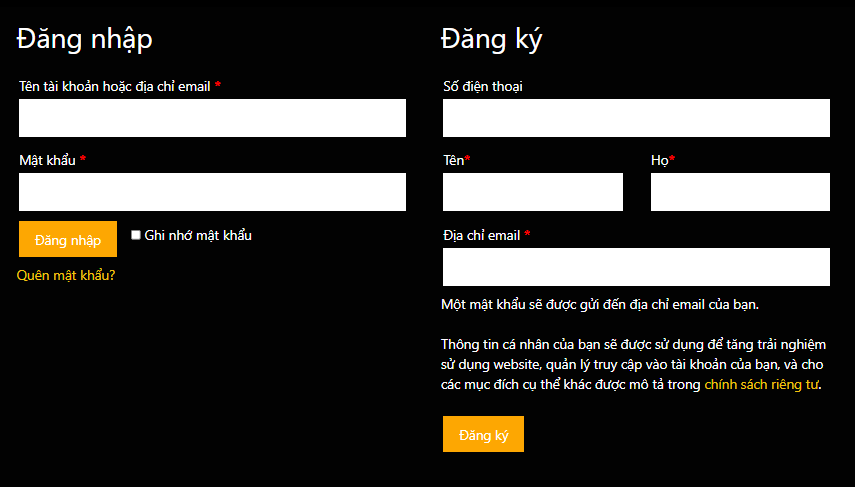
Kết quả như hình:
Như vậy là đã thực hiện thêm trường dữ liệu mới vào trang Đăng ký của WordPress (Woocommerce) xong rồi, chúc các bạn thành công.